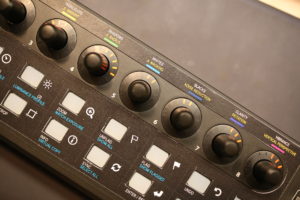
 There have been many versions of Lr consoles for editing released in the last year or two. Most of these options are 1) expensive 2) expensive 😉 As I enter into event photography, editing 1000s of photos is getting quite tiring and time consuming even with presets and Lr’s great batch functionality. I wanted an easy way to fine tune image to image without scrolling up and down through Lr’s panels.
This is the most affordable alternative to the Loupedeck and Palette Gear (both of which are designed for and work amazingly) but cost way too much to be limited to one use in my opinion. These options are designed for Lr and have labels and actions already assigned to each button with a few function keys that are left to the end user to assign. They are all very well thought out and priced accordingly.
I decided to go with the open source option. It requires a bit more setup but not significantly more and the money I saved made it worth it. I’m going to break everything down and hopefully you’ll have an easier experience than I did.
What you’ll need:
The unit: Behringer X-Touch Mini – $49.99 on Amazon
Adobe Lightroom
Software: MIDI2LR – Free
The rest of the files: my dropbox
A Windows computer for part of the setup process (once it is setup, everything is MacOS/Windows compatible)
Setup (contributions by Joseph Naim)
- Make sure your computer recognizes the controller when you first plug it in.
- My Macbook needed some help through the “Audio MIDI Setup”.
- Run Behringer X-Touch Editor
- (ON WINDOWS PC ONLY – I used Parallels but finding a friend with a Windows PC or Bootcamp should work as well)
- Load “Behringer X-Touch Editor Preset (Layer A).bin” and ‘Dump A’ to Hardware
Laod “Behringer X-Touch Editor Preset (Layer B).bin” and ‘Dumb B’ to Hardware
Exit X-Touch Editor- Windows portion complete
- Install Midi2LR
Locate the MIDI2LR.lrplugin installation folder. (ie C:\MIDI2LR.lrplugin)
Open “Behringer X-Touch Midi2LR presets.rar” and copy folder into ‘MIDI2LR.lrplugin’ folder. - Run MIDI2LR and goto Settings
Check “Enable Pickup Mode”
Click “Choose Profile Folder” and select “C:\MIDI2LR.lrplugin\Behringer x-Touch Mini” - Run Lightroom
Goto File> Plug-in Extras> Load Presets
Select “MIDI2LR Lightroom Settings Preset.txt” and select ‘Open’ - Goto File> Plug-in Extras> Options
- From here, everything should be pretty much set up. The rest is up to you to customize and edit to your liking.
I personally decided that I wanted to start from scratch to make it fit my workflow better however I did use the original .xml files to save myself some work with the Hue, Sat, Luminance sliders. The .xml files listed in the presets folder can be edited in text form (via text editor) instead of using the MIDI2LR interface to add and change button actions. I found this a little faster if you know what the actions are called.
Some things that took me time to figure out. The Lightroom plugin extras > options window is where the magic happens.
You can add keyboard shortcuts as single button pushes. For example, “before/after” is not listed in the original plugin. You can add in “\” as one of the open keyboard shortcuts and then assign that as a button. Similarly, you can assign your presets as buttons and develop module filters as individual buttons.
Hope that wasn’t too wordy and it helped a little bit. Feel free to comment with any questions.
Learning Curve: Installation was a bit tricky on a Mac, I knew this going in. It was hard because I was on Parallels trying to do the Windows portion and couldn’t tell if it was getting confused at where to be inputting or if something was wrong with the unit. Eventually I learned I needed to enable the device through the MIDI settings of MacOS itself.
Once that was working, everything seemed to click into place (sorta literally). Everything worked as advertised and the customization began. Learning how to customize had a bit of a learning curve but that’s because I flipped the entire thing on its head and buttons were on opposite sides of where they started. You don’t have to do that obviously.
Using the unit itself versus a keyboard and mouse? I found felt awkward for the first few photos and just figuring out how to get your muscle memory to go toward certain encoder knobs and where they were. I found myself playing with the Hue/Sat/Lum options way more now than I used to.
I found this useful when editing event photography, making changes in exposure from photo to photo and also found straightening photos easier with this versus using the mouse/keyboard. You save a few clicks and that adds up across 100s-1000s of photos.
OTHER OPTIONS
Because MIDI2LR is just software, it’s compatible with any MIDI controller. You can roam Amazon and the web for other options and there are plenty, just keep these things in mind.
Encoder knobs and motorized sliders are the best options
Unmotorized sliders still work but you can imagine, when you’re moving between photos, the settings will not update on the slider and then you will have to manually move them past their current values before the sliders go into effect.
Encoders are infinite spin so they are always ready. Motorized sliders update according to their values between photos on their own.


